


Over time, my approach to integrating analog gear into my mixes has regularly shifted. From obsessively collecting and constructing elaborate hardware chains to fully embracing ITB mixing, and eventually landing somewhere in between. It’s been a process, and I’ve thoroughly nerded out on the subject along the way.
This experience has provided me with valuable insights into the expectations associated with using analog gear, while opening my ears to some unexpected limitations of digital processing.
I’ll share some suggestions based on this experience - things I’ve learned that I feel specifically aid in making my ITB mixes sound more analog. Or shall I just say less digital, now that I have your attention?
1. Go Dark(er)
Consider the simple lowpass filter as an instant analogizer - but not for the obvious reasons.
Removing information above the audible range that would ordinarily have been lopped off by analog processes, can be highly beneficial - particularly on sources that will later be heavily compressed or distorted. Certain samples and synths have intense amounts of high-frequency content. Another example is vocals recorded on mid-level, solid-state equipment (looking at you, Apollo Twin).
Excessive out-of-range frequencies can contribute to audible aliasing (digital distortion), adversely affecting the signal within the audible range. Analog gear gracefully handles these out-of-range frequencies due to the bandwidth limitations of its components.
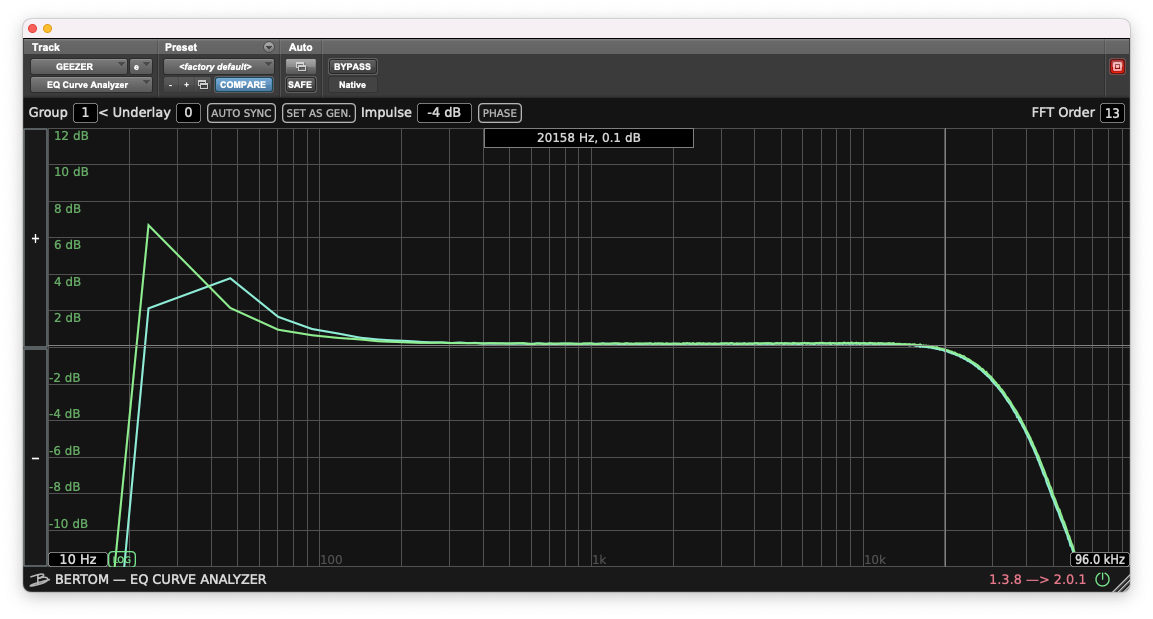
Here’s a capture of the frequency response of my Neve 33609, demonstrating a roll off at 20kHz, likely due to the transformers. In contrast, compare that with the response from a Slate Neve compressor emulation.

My favourite high-pass filter is the Dangerous Bax, mainly because of its fixed frequency options, which require less time for fuss and adjustment.
2. Slow Release: Analog Squeeze
Try slowing down your compressor release settings to fatten things up.
Adjusting compressor release settings to slower values can add a level of richness and sustain to your sounds. While a fast release can create an upfront, more aggressive but ultimately grainier sound, a slower release time can give that pillowy, warmer thing - often attributed to the qualities of analog compressors, particularly vari-mu types.
The fastest release time on a Fairchild is 300 milliseconds… now compare that with the lightning-quick release of your digital tools.
Experiment with longer release times when you want the compressor action to be simultaneously more transparent and gooey. A slow release will grab the sustain and tails of sounds and reframe the signal for a fuller, bigger presentation.

Try this great sounding, free vari-mu style plug from Klanghelm.
3. FX: Be Unique
Widespread use of popular (for good reason) plugins, like Valhalla Vintage Verb and Soundtoys Echoboy, has arguably left a significant mark on the sound of modern mixes, possibly as much as the famed analog gear regularly used to record them.
You probably own and use these plugins. You’ve probably recognised their tone in the music you listen to.
It’s important to give yourself even a sliver of a point of difference when using these very common FX. I do so by stacking up other ambiences, tape sims, modulations, so my FX returns effectively become chains. I also exclusively avoid using stock presets.
Here’s an example using a common vocal delay where I’ve blended in subtle amounts of other processors to spice it up. Become more unique by copying this!


Another superb freebie from Aberrant DSP that I very highly recommend.
I actually use all of the freebie plugins
4. Saturate and Filter: Nuanced Layering
This is the hardest to get ‘right’ if you’ve had limited experience with analog equipment.
I tend to saturate tracks in very subtle, layered amounts. When I was a boy, an analog mix would typically travel through multiple electronic components that introduce minute levels of distortion, grain, HF & LF roll offs. The Op-amps, VCA’s, valves, transformers, all contribute to this nuanced coloration.
If I’m working with particularly clean tracks, I will lean on a few plugins that I’ve developed starter presets for, with settings optimised at the levels I prefer to mix. I will stack them up at the front of the processing chain to emulate the layered effects introduced by analog components. Subtlelty is key here. It all adds up.
An example would look like this:


I recommend this free preamp stage plugin by Fuse Audio Labs.
5. Mix at 96kHz: Mitigating Aliasing Artefacts
Avoid aliasing artefacts by opting for a higher sample rate during mixing.
Ever found yourself deep into a mix and started noticing that your higher mids have become a bit barky and meshed together? This is probably the result of cumulative aliasing (or bad mixing!). It's especially problematic in saturators, compressors, and limiters, and is a purely digital issue.
I use Voxengo r8brain to upsample stems to 96k before I get started with a mix.
Cutting this last one short, as it might make for a more though provoking, deeper post with some definitive audio examples.
Thanks for reading, subscribing, and recommending. I’m doing this purely out of curiosity, as a bit of a mental exercise. Sharing thoughts to make way for new ones.
Things to look forward to in future posts:
Vocal chain processing, fx, perspective
Prepping vocal tracks for mixing… Zzzzz
Dealing with low end: Volumes 1-∞
More quick , quality suggestions
I’ll also be roping in friends to share their top studio tricks or mixing tips, so this little corner doesn’t become too one-sided.